My blog has moved!

You should be automatically redirected in 6 seconds. If not, visit
http://ahungrybear.com
and update your bookmarks.

Sunday, March 30, 2008

filet mignon

filet mignon and roasted potatoes

Despite all the trial and error with slightly more elaborate dishes that I typically prepare, I think deep down I'm just a meat and potatoes kind of person. Or at least that's what I believe when I'm eating this filet mignon. This isn't really a recipe, more of a technique, but it is so much better than simply grilling this particular cut of meat that it's worthy of discussion. It really reminds me of the Ruth's Chris style steak (although they claim to cook theirs in an 1800 degree oven, the likes of which I will never have access to). I like to serve it with roasted potatoes with truffle oil, and a simple caesar salad.

Grocery list: filet mignon steak, olive oil, salt and pepper. For the potatoes -- baby potatoes (I used purple, but any type will do), truffle oil.

filet mignon prep

To prep the steak, let it sit out of the fridge for about 15-20 minutes, so it comes to room temperature. Coat the steak with olive oil and season generously with salt and pepper. Heat the oven to 450 degrees. Heat a heavy grill pan over medium-high flame. Sear the steak for about 1-2 minutes, then flip, cook for 1 more minute, then place in the oven. Cook for 4 minutes, flip, and cook for 3-4 more minutes, depending on the thickness of the steak and how well you prefer it cooked. Let stand for a few minutes before serving.

potatoes prep

I typically make the potatoes first, while the steak is sitting out on the counter warming up. Wash them, slice in half, toss with olive oil and salt and pepper, then pour the potatoes onto a foil-lined baking sheet. Cook for 10 minutes in a 400 degree oven, flip the potatoes, and cook an additional 10 minutes. Remove from the oven, and turn the oven up to 450 for the steaks.

meat and potatoes

Saturday, March 29, 2008

sopressata paninis with roasted red pepper tapenade

100_2502

I used to be very weirded out by any sandwich meat outside of turkey, but in the last couple of years have started to see that I've been missing a lot of deliciousness. Sopressata is one of those meats that I wish I had known about a long time ago. It's an italian cured pork sausage, made with black peppercorns, and just a slice or two can make a basic grilled cheese turn into an amazing experience. For this sandwich, I broil it with fresh mozzarella, some slices of black forest ham, and this red pepper and olive spread that is quickly made in the food processor.

Grocery list: sliced sourdough or italian bread, 2 slices of sopressata + 2 slices black forest ham (per sandwich), fresh ovaline mozzarella. For the tapenade: kalamata olives, fresh basil leaves, 2-3 roasted red peppers, olive oil, garlic, thyme, red wine vinegar.

100_2497

Start by making the tapenade. Make sure you pit the olives first, and then put about 15 of them in the processor. Follow with the red peppers, 2-3 garlic cloves, a handful of basil leaves, a sprig of thyme leaves (remove the stems), and pulse for a few seconds until the olives and peppers are coursely chopped.

100_2498

[Edit - forgot originally to include the rest of the directions for the tapenade here. After initially pulsing the olive mixture for a couple seconds, remove the lid and add a splash of red wine vinegar and stir to get the bigger chunks of olives down from the sides of the processor bowl. Return the lid; while pulsing the food processor, pour in about 1/4 cup of olive oil. You want the tapenade to have a thick consistency - spreadable, but not runny.

100_2501

Next, turn on the broiler. Toast both sides of the sliced bread. Then, smear both sides of bread with the tapenade, and on one side of each sandwich place a few slices of fresh mozzarella. On the other side, put 2 slices of ham and 2 slices of sopressata. Return to the broiler until the cheese is bubbling and the top of the salami starts to crisp.

Wednesday, March 26, 2008

tortellini soup

100_2506

This is an incredibly simple recipe that is usually easy to throw together with staples in the pantry/freezer. It's not too heavy but still qualifies as "comfort food." Grocery list: one onion, one bag of spinach, a few cloves of garlic, 2 quarts of chicken broth and some tortellini.

100_2500

Start by sauteeing an onion and a few cloves of garlic in olive oil, add 2 quarts of chicken broth and bring to a slow boil. Add tortellini (freezer, fresh, or dried versions all work), about 3 or 4 servings, and cook according to package directions. Just about a minute or 2 before the tortellini or done, add a 9 ounce bag of fresh spinach. Serve with a squeeze of fresh lemon juice, lots of cracked pepper, and a sprinkle of grated parmesan.

Monday, March 24, 2008

sunday afternoon lasagne

lasagna finl

This is a Sunday afternoon dish because it's great to make ahead for the week, and also because you need about 4 hours to prepare it. There are some very easy shortcuts to trim that down to about 45 minutes of active prep time, if you don't want to spend an afternoon in the kitchen. It takes about 3 hours to make the bolognese sauce the traditional way, and I love it. You could actually make this for any kind of pasta, since it can stand on its own. (The bolognese is basically Marcella Hazan's recipe, with the addition of pancetta, which imparts a rich flavor.)

Grocery list: 1.5 pounds of ground beef, 2 carrots, 2 ribs celery, 1 onion, 2 ounces pancetta, whole milk, dry white wine, nutmeg, 1 28-ounce can of whole peeled plum tomatoes, 1 pound lasagne noodles, 30 ounces ricotta cheese, 1 egg, parsley, 1 pound mozzarella (grated).

100_2507

Start by making the bolognese sauce. Over medium heat, melt 3 T butter plus 1 T olive oil, then add chopped onion. Cook for 1 minute, then add the cubed pancetta and cook for 2 more minutes. Add the chopped celery and carrot, and continue to saute for another 2-3 minutes.

100_2508

Add the ground beef and break up into small pieces. Cook until it is just a little pink, then add a tiny pinch of nutmeg and season with salt and pepper. Pour in 1 cup of whole milk, and keep cooking until all the liquid cooks out, which may take a while. Then add a cup of dry white wine, and cook this completely down as well.

100_2510

At this point you add the whole can of tomatoes, juice included. When the bot returns to bubbling, turn the heat down very low. Stir occasionally; after a while, the tomatoes will soften and easily break apart with a spoon. Keep simmering for a couple of hours.

If you need to boil your pasta noodles, get started on that now (while you work on the ricotta mixture, as the bolognese sauce is finishing). Boil according to the directions, then rinse in cold water and spread each noodle flat in a cookie sheet. Keep layering parchment paper and noodles so they all can dry flat and not stick together.

ricotta filling

For the ricotta mixture, take 2 15-ounce containers of ricotta and add to 1 beaten egg. Stir in salt, pepper, and a handful of chopped parsley.

assembling

To assemble the lasagne, oil the bottom of a large lasagne pan. Spoon a little bolognese sauce into the bottom, then layer the noodles. Spread the ricotta cheese over the noodles, then layer in the grated mozzarella. Repeat with sauce, noodles, ricotta, and mozzarella until you're out of ingredients (typically about 4 layers), ending with mozzarella. You can sprinkle a little grated parmesan on the top as well.

100_2516

Bake for around 40 minutes at 375 degrees, until the top is golden and bubbly.

Friday, March 21, 2008

pasta with gorgonzola and walnuts

pasta with gorgonzola and walnuts

This is a simple 15 minute dish, nice as a side but also very easy to make just 1 serving for lunch.  To make it, just boil any kind of pasta, and while it's draining, heat a little olive oil and butter, throw in a handful of walnuts to toast.  Then add the pasta back in and a few ounces of gorgonzola.  Season with salt and pepper, and that's it.

Wednesday, March 19, 2008

roasted halibut with citrus olive tapenade

roasted halibut with citrus olive tapenade

In my quest to eat fish once per week (our previous trend of steak 3 times a night was probably more fun for me than my arteries), I've discovered the simple pleasure of this combination: olives and fish. Yes, really. This unique tapenade would work well on top of any white fish, either pan fried or roasted. If you have a very thin, skinless piece of fish, like tilapia, I would recommend just dusting it with flour and then pan frying it. Halibut is finally back in season, so I had to go with that, and since this is typically a much thicker cut of fish, roasting is my favorite method. It keeps the fish so tender and succulent, but still a little crispy outside.

Grocery list: handful of green olives, 1 navel orange, 1 lemon, a few sprigs of parsley, 2 garlic cloves, red wine vinegar, olive oil, fish (about 1 pound for 2 people).

citrus olive relish

Start by prepping the tapenade (it will only get better as the flavors steep later, when you're cooking the fish). Mince the garlic, zest the orange and lemon -- about 1 tsp of each. Finely chop the parsley. Over a bowl, so you can catch all the juice, start peeling the orange. You want to remove all the white pith, even the stuff inside in between pieces. Little bite size pieces of orange go in with the other ingredients. Add a splash of the reserved orange juice, a squeeze of 1/2 lemon (save the other half of the zested lemon for the asparagus, if you serve that on the side), and a little (1 T?) of red wine vinegar. Stir and set aside.

To roast the halibut, preheat the oven to 375 degrees, then heat a heavy skillet over med-high heat. Add a T olive oil and 1 T butter. Salt and pepper the fish, then dredge in just enough flour to coat. Cook skin side up for 4-5 minutes, until brown, then flip the fish over. Place in the oven and cook for about 10-12 minutes more.

When you remove the skillet from the oven, the fish should easily separate from the skin (if, like me, you don't like that part). Top with the tapenade to serve.

Tuesday, March 18, 2008

guacamole

guacamole

I'm obsessed with avocados in any form, so guacamole is one of my favorite foods. This is how I normally make it, although you can make this as basic as avocado, lime juice and salt and it would still be delicious.

Grocery list: per 1 avocado, you'll need 1/2 diced roma tomato, 1 T chopped cilantro, juice from 1/2 lime.

mashing avocados

Slice the avocado lengthwise, then pop out the seed (if you use a knife and quickly hack the seed so the blade gets stuck in the core, then just twist the blade and it pops right out). Spoon out the avocado into a bowl, sprinkle generously with salt and add lime juice. Mash with a fork to whatever consistency you like, then stir in the tomatoes and cilantro.

enchiladas verdes

green enchiladas

This enchilada recipe is adapted from one I found in F&W magazine a few months ago. I have made it a little healthier by not frying each individual tortilla in oil prior to filling. I also used flour tortillas instead of corn, since they are a little softer and don't really miss the added oil.

Grocery list: 2-3 cups shredded chicken (see roast chicken instructions below, or simply use a rotisserie chicken), 2 cups shredded cheddar, 2 pounds tomatillos, 1 jalapeno, 6-8 flour tortillas, olive oil, plus guacamole (here's my recipe), tomatoes, cilantro, limes, sour cream for serving.

tomatillos

Start by making the salsa verde -- if only I had known how easy this would be, I would have never bought jars of this stuff in the past. The tomatillos need to be husked first, which is very easy. Rinse the sticky residue on the skin after removing the husks. Slice the jalapeno in half lengthwise (I left the seeds in so the salsa has some kick). Boil the peppers for 10 minutes, then drain and move to a blender. Process till smooth.

salsa verde

In a large deep skillet, heat a few T of olive oil, add the salsa, and season with salt and pepper. Bring almost to a boil. Spoon just enough of the salsa into a 9x13 pyrex baking dish to coat the bottom.

frying tortillas

Place a small non-stick fry pan next to the skillet, then over medium heat, heat each tortilla for about 20 seconds per side (careful not to burn it, since there's no oil being used!). Move the tortilla directly into the hot salsa, and flip it so it's coated. Remove to a plate.

rolling an enchilada

After the tortillas are all done, you can start filling them with the cheese and chicken. Roll and place seam down in the baking dish. Top with any remaining salsa and a handful of cheddar, and bake at 350 degrees for about 30 minutes, until bubbling.

enchiladas ready to bake

Serve topped with sour cream, guacamole, tomatoes, cilantro, etc.

roasted chicken

roasting chicken

I know this is very basic, but it's so useful to me to have a good technique for roasting chicken that can be used in any dish (like enchiladas, or even just on top of salads) that I figured I'd share... Again, I keep noticing that there are pre-packaged cooked chicken strips, and I'm wondering why these companies are able to "trick" people into thinking that the from-scratch method is really that much harder. This is SO easy, and so healthy, and cheaper -- why wouldn't you?

As you can see, I just took a split chicken breast, boneless and skinless -- it was almost a pound. This is enough for the enchilada recipe. Sometimes I'll do several though, because chicken is good to keep in the fridge to just throw on sandwiches or salads. Simply line a roasting pan with foil, drizzle olive oil over the chicken breast, salt and pepper it, and squeeze half a lemon over it (just throw the squeezed lemon right in the pan next to the chicken, it will keep imparting its flavor while everything is roasting).

Roast for 25-30 minutes at 400 degrees, you can flip it if you like but that's not necessary. Turn off the oven, and let the chicken rest for about 10 minutes. Then you can slice it, or use a fork to shred it, as in the picture above.

Monday, March 17, 2008

ham and gruyere quiche

ham and gruyere quiche

Quiche is a dish that I make fairly regularly, especially in the spring and summer, and I never really follow a recipe. The gist is basically start with a crust, put whatever cheese(s) and other filling in the bottom, then cover with egg mix and bake until it's set. I haven't found a combination of fresh spring vegetables and good quality cheese that I don't like. So when I saw an article recently (in Elle Decor, of all places) about it being the "season for quiche" now that it's spring, it reminded me that it's time to have a little brunch get-together.

I followed the article's recipe somewhat, because I have never made a crust as light and airy as this one was described. The foundation is phyllo dough, paper thin sheets of dough that you have to glue together with egg wash. I tried this to see if the challenge was interesting, and even though I now know I can make a phyllo crust for quiche myself, I probably will stick to the old fashioned southern pie crust in the future. It has a more solid, salty, dense texture, which I prefer. But I'll walk you through this one anyway, because phyllo crust is just good to know about...

Grocery list: phyllo dough (I found this in the freezer section of WF, a single box of 20 sheets), 8 eggs, 1 c half and half, ham, gruyere, goat cheese, 1 roma tomato, 5 T breadcrumbs, about 3 cups uncooked rice.

phyllo step one

Lay one sheet of phyllo down on the counter. Beat a single egg in a bowl, and brush a little egg wash on the surface of the dough. Sprinkle 1 T plain breadcrumbs over. Add another sheet of dough, and repeat the layers (dough + egg wash + breadcrumbs) until you have 6 total sheets of dough, ending with dough on top.

cutting quiche crust

Take your pie plate and set it on top of the dough layers. With a pointy knife, cut the dough *about an inch wider than the perimeter of the pan*. This is important b/c the dough shrinks when you cook the crust, and if you cut it to the exact size to start with it will shrink and not cover the bottom of the pan.

Take the dough layers and put in the bottom of your pie pan. Lay down a sheet of parchment papers, then cover with the uncooked rice, to weigh down the paper. Bake 12 minutes at 350 degrees, remove from the oven to cool (remove the rice and paper first), and turn the oven down to 300 degrees.

Grate a handful of gruyere and crumble an equal amount of goat cheese. Slice a handful or 2 of ham (virginia ham is perfect -- you can ask for 1-2 thick slices at the deli counter). Sprinkle the ham & the cheeses in the bottom of the crust. I prefer to slice the roma tomato and arrange the slices around the pan so when it cooks, each piece of quiche will have a slice of tomato right in the center.

custard mix

The egg mix is 4 whole eggs plus 1 egg yolk, beaten together with 1 cup half and half and a pinch of white pepper, tiny pinch of cayenne, and salt and pepper. Pour this over the toppings and bake for at least 45 minutes. You'll know when it's done because the top will be golden and the egg mixture "set" -- i.e. if you shake the pie dish a little, it shouldn't be liquidy in the middle.

Let set on the counter for 10 minutes or longer before slicing and serving.

Saturday, March 15, 2008

buttermilk pancakes

buttermilk pancakes

Whenever I crave good pancakes, I always assume this means I have to make a trip to either the Flying Biscuit (great oatmeal pancakes) or to the Original Pancake House in Atlanta. I associate at-home pancakes with the crappy Aunt-Jemima all-in-one mix or Bisquick or whatever, and those don't come even close to "real" pancakes. This morning I realized I had some buttermilk, some flour, some eggs -- why not try to make them from scratch? I found this fairly generic recipe on foodnetwork.com, and made a half batch (the half batch is listed below), which made 6 pancakes.

Grocery list: 1 cup a/p flour, 1 tsp baking powder, 1/4 tsp baking soda, 2 T sugar, 1 egg, 1 cup buttermilk, 2 T melted butter, extra butter for cooking.

Sift the dry ingredients together in a bowl. Stir the buttermilk, melted butter, and 1 beaten egg together. Stir the wet ingredients in with the dry *but don't overmix the batter!* You want to keep it lumpy; if you over-stir it, the pancakes won't turn out fluffy.

pancake batter

Melt a T of butter in the bottom of a fry pan, then spoon the batter into the pan. You'll know it's time to flip when the pancakes are bubbling and you can see the edges are golden. This entire process took about 3 minutes longer than making the "instant all-in-one" pancakes, so I've got a great back-up plan next time I don't feel like trekking across Atlanta for a buttermilk pancake fix...

cooking pancakes

Side note: I served this with a simple side of fried bacon. I prefer the Maverick Ranch hormone- and antibiotic-free bacon, it's delicious.

sauteed spinach

sauteed spinach

There's a similar recipe for this in the Moosewood cookbook, but I've adapted it from its original (which was a wilted spinach salad with pecans) to more of a fully-cooked sauteed version.

Grocery list: 1 9 or 10-oz bag of fresh baby spinach, 2-3 cloves garlic, handful of walnuts, handful of dried cranberries.

Start by mincing the garlic and heating 1-2 T of olive oil in a large saute pan. Cook the garlic for about 2 minutes, then add the bag of spinach. Keep rotating the spinach around so it cooks -- it will look like a LOT of spinach but will quickly cook down into 2 servings. After the spinach has wilted, add the cranberries, walnuts, salt and pepper to taste, and continue to cook for another few minutes. That's all there is to it.

lynn's chocolate kahlua cheesecake

chocolate kahlua cheesecake

I don't normally make a lot of desserts, and I'm one of those weird people that never craves chocolate. I've wanted to learn how to make this for A, knowing that it's his favorite dessert ever. The recipe comes from Lynn, a coworker who adores A (she says he reminds him of her son) and makes this for him every year on his birthday. My first 2 or 3 attempts were disastrous (first time, I didn't think it mattered if I used a regular cake pan instead of a spring-form pan, other times I didn't realize how long the cake needed to cool before removing the outer edge of the pan...). I'll try and give very specific directions so you can nail this on your first try.

Grocery list: chocolate graham crackers, butter, heavy whipping cream, 24 oz cream cheese, sugar, 3 eggs, 1/2 pound block chocolate (semisweet), dark cocoa powder, vanilla extract.

chocolate crust

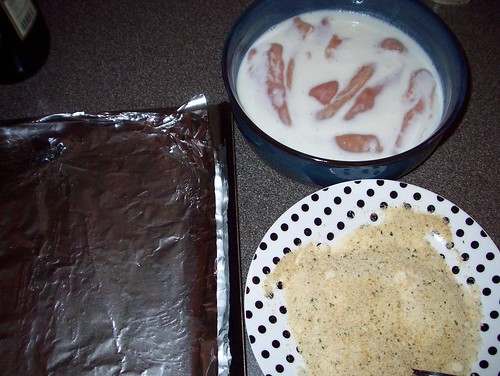
Start by making the chocolate crust: take one package of chocolate graham cookies (normally 3 per box -- just use 1 of them), and crush them with a rolling pin in a large ziploc bag. This should make about 1.5 cups of chocolate cookie crumbs. Melt 1/4 cup (one half stick) of butter, and stir this in with the crumbs and 2 T of sugar in a bowl. The consistency will still be crumby, but don't worry. Press the crumb mixture into the bottom of the spring-form pan, and partway up the sides. Freeze for 5 minutes, then bake at 350 degrees for 10 minutes. Remove and set aside.

chocolate crust 2

There are 3 main parts to the actual cheesecake: the cream cheese base, the chocolate sauce that you mix into the base, and the chocolate icing. You can ignore the icing part until later, when the cake is cooling.

chocolate chunks

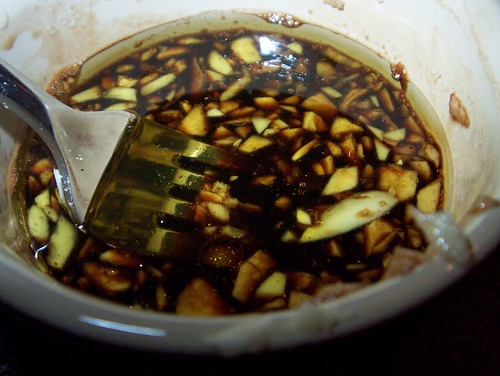
Next, work on the chocolate sauce. Start by chopping up the 1/2 pound block of chocolate and divide this (should be 3/4 cup + 1 cup). Melt the 3/4 cup chocolate chunks in the microwave, for a minute at a time, stirring in between, until smooth. Stir in 1/4 cup kahlua and 1/4 cup whipping cream -- keep stirring till smooth. I actually used half and half in place of all the heavy cream in this recipe and it turned out fine, so whatever your preference.

cream cheese base

Now, for the cream cheese base. I used 3 8-oz packages of neufchatel cheese (lower fat version of cream cheese); soften these by leaving out on the counter for about an hour before starting to cook. Using a hand or stand mixer, beat together the cream cheese and 1 cup sugar. Then blend in 1/3 cup powdered dark cocoa (I use Ghiradelli brand). Add the eggs, one at a time, blending well after each.

chocolate sauce with base

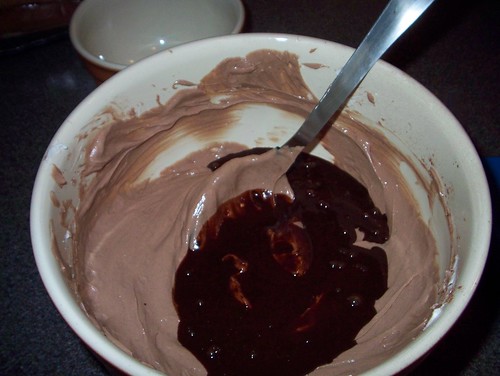
Now, with a big spoon, just stir in 1 tsp vanilla extract into the cream cheese mixture. Then stir in the chocolate sauce. Stir well, then pour all of this into the spring form pan. Bake for 10 minutes at 400 degrees, then turn the oven down to 275 and bake for 45 minutes more.

cheesecake before baking

Here's the part I learned the hard way - patience is key. After 45 minutes, turn off the oven and open the door, but leave the cake there, resting. After about an hour, place the cake in the fridge for about 2 hours, then bring it back to the counter for final icing.

cheesecake

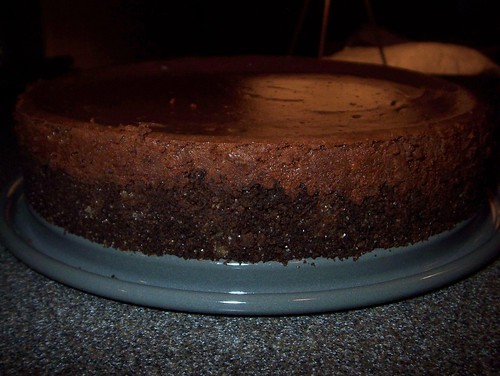
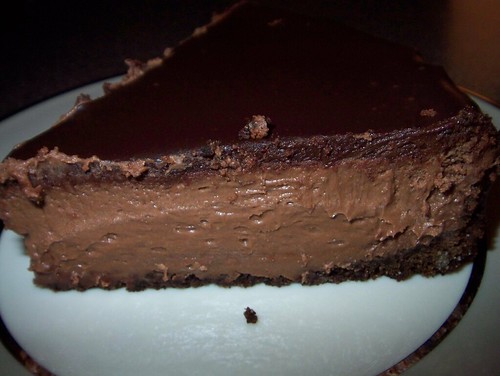
To make the chocolate icing, melt the last 1 cup of chocolate chunks in the microwave. Stir in 1/4 cup whipping cream and 2 T kahlua. It will seem very liquid-y, not like icing, but you're going to refrigerate it to harden. Now, take a butter knife and run it along the edges of the spring form pan to loosen the cake. Very carefully remove the sides of the pan. Pour the icing right on top, and using a spatula, carefully smooth the icing around, allowing some of it to run over the outer edges.

chocolate sauce

Return the cake the fridge for at least 4 more hours before serving.

Thursday, March 13, 2008

green beans with apples and almonds

green beans with apples and almonds

Green beans are one of my favorite vegetables ever, and this is my favorite way to prepare them. Grocery list: just green beans, an apple, and handful of slivered or sliced almonds.

Wash the green beans and snap the ends. Cube the apple. Heat olive oil over med-high heat in a large pan. Add the green beans and cook a few minutes before adding the apples and almonds. Stir frequently until the beans are as crispy-done as you like them. The apples will caramelize a little and get even sweeter, and the almonds will toast. Season with salt and pepper and that's it...

Wednesday, March 12, 2008

old school mac-n-cheese

old school mac-n-cheese

My mom used to make macaroni and cheese with hot dogs when we were kids, so it's a true comfort food for me. the hot dogs are definitely optional, but if i want a grown-up mac-n-cheese dish i usually take an entirely different approach. Grocery list: hot dogs, pasta (elbow or penne), milk, cheddar cheese, butter.

Start by boiling the noodles (2 cups elbow noodles, more if you're using a bigger pasta like penne or ditali). Slice 4 hot dogs and spread in the bottom of a 9 x 13 pyrex dish. I just discovered this brand called Maverick Ranch, and their hot dogs are all beef, no hormones or antibiotics or preservatives -- and they taste SO much better than the cheaper kinds. Cook the noodles till they are al dente, or even 1 minute shorter than al dente. Drain and rinse with cold water.

Grate about 4 cups of cheddar cheese. Reserve a handful or 2 for sprinkling on top, and the rest will go into the cheese sauce. To make the sauce, melt 4 T butter in a saucepan over medium heat, stir in 4 T flour, and a dash of ground white pepper and ground mustard. Stir as a paste for about a minute, then slowly start adding milk a little at a time, continuing to stir. You'll eventually add 2-3 cups milk. Bring the white sauce almost to a boil, then add in the cheddar, and season with salt and pepper. When the cheese is melted, remove from the heat.

mac-n-cheese2

Layer the noodles over the hot dogs, then pour the sauce over. Sprinkle the cheese on top and bake 30-40 minutes at 375 degrees, until bubbly and the cheese starts to brown on top.

Tuesday, March 11, 2008

parmesan chicken tenders

parmesan chicken tenders

An easy, crunchy, Italian version of fried chicken, which is a combination of my 2 favorite types of food... Grocery list: 1 pound chicken tenders, parmesan cheese, italian bread crumbs, and buttermilk. For the vinaigarette, you'll need 3 garlic cloves, balsamic vinegar, and olive oil. The recipe below is for one pound, but you can adjust for more/less.

making chicken

Start by soaking the tenders in about a cup of buttermilk, for at least 15 minutes in the fridge. In a shallow bowl, mix 3/4 cup parmesan with 1/2 cup breadcrumbs. Dip the tenders in the crumb mixture to coat, then place on a baking sheet lined with foil (brush the foil generously with olive oil first). Then drizzle more olive oil across the chicken tenders, and bake for 15 minutes at 450 degrees.

garlicy vinaigrette

To make the vinaigrette, mince 3 garlic cloves and place in a small bowl or ramekin. Mash salt into the garlic, season with pepper, then pour 3 T of balsamic and 1/4 -1/3 cup olive oil. Serve the vinaigrette alongside the tenders for dipping.