My blog has moved!

You should be automatically redirected in 6 seconds. If not, visit
http://ahungrybear.com
and update your bookmarks.

Thursday, January 29, 2009

gorgonzola and walnut stuffed flank steak

gorgonola walnut stuffed flank steak

Flank steak is one of my favorite cuts of beef to feed a group (or one large bear). It's inexpensive, if you pick a good cut it's quite lean, and it dresses up so well. You can stuff it with many combinations (try spinach, feta & pine nuts), but this particular recipe is close to my heart. Several years ago, for valentine's day, A surprised me with this cooking-for-2 class. Despite being the youngest couple there by about 25 years (this is apparently quite popular with the empty-nester crowd), we had so much fun. On the menu was this flank steak, roasted potatoes with truffle oil, and a spinach souffle. A certainly got his money's worth with this gift; I've made this dish at least once a month every since I learned it. And I bet you will too.

Grocery list: 2-3 pound flank steak, gorgonzola cheese, walnuts, 3-4 shallots, olive oil.

flank steak pounded thin

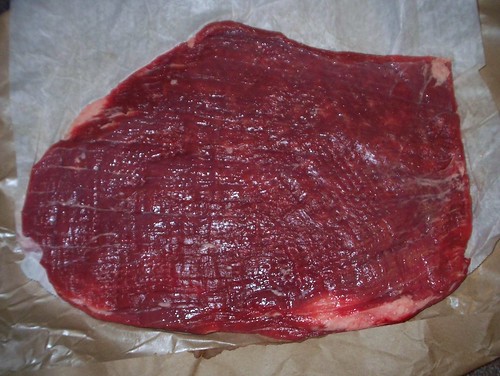
Before you can start, the flank steak has to be pounded thin, to less than half an inch thickness. If you ask nicely, sometimes your butcher will do it for you. Or, just lay it down on parchment paper, cover with a few layers of plastic wrap, and pound with a meat mallet. Try and get it as even as possible, and work it into a rectangle like this as best you can.

sauteed shallots for flank steak

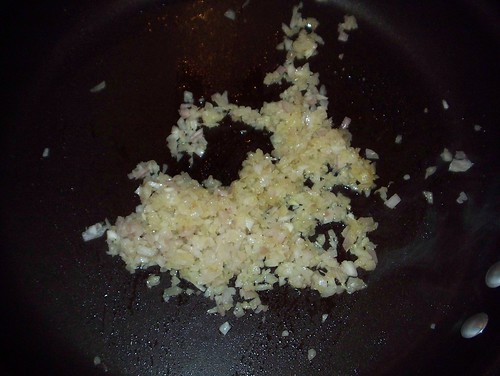
Mince the shallots and saute in olive oil until they are translucent, about 3-4 minutes. Season with salt and pepper, remove to a plate, and allow to cool. Wipe out the pan with a towel, and toast about 1/4 cup of walnuts for a few minutes. Chop.

shallot walnut gorgonzola filling

When the shallots and chopped walnuts are cool, spread them across the flank steak, along with a couple of ounces of gorgonzola cheese crumbles. Leave one edge of the flank steak empty, so when you roll it up (this will be the outside edge), stuff doesn't fall out.

tying flank steak

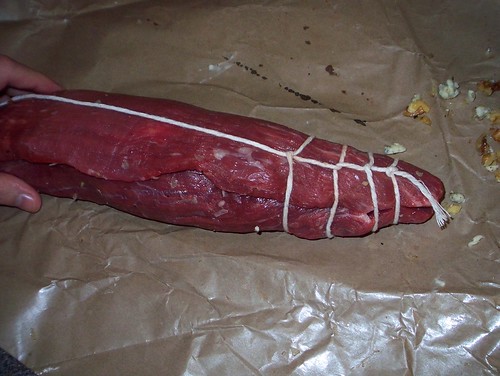
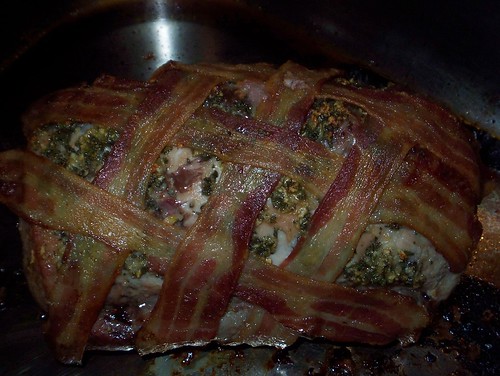
Now comes the fun part. Roll up the flank steak, and tie it with kitchen twine every inch or so along the steak. The cooking class taught us a cool trick for doing this with a single long piece of twine - like adding a slip knot every inch. I still ask A to help me with this every time, since he's so much better at it than me. If I have to do it, I just cut little individual pieces and tie them separately - elementary but effective.

tied flank steak

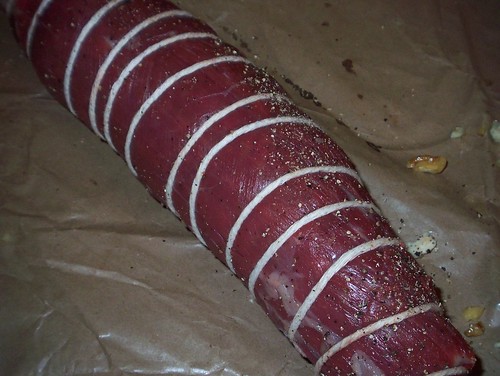
When it's all tied up, season the outside with salt and pepper. Preheat the oven to 375 degrees.

searing flank steak

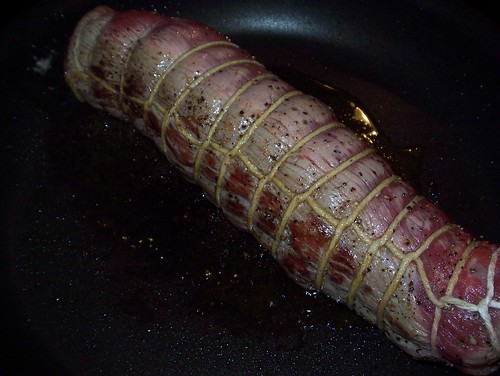
Heat a swirl or 2 of olive oil in a large oven proof skillet. Sear the flank steak for 4-5 minutes - keep rotating it every minute or so, so all sides are browned. Transfer to the oven and roast for another 20 minutes.

flank steak ready to slice

When it's done, allow it to rest for 10 minutes on a cutting board. You can go ahead and cut off the twine while it's resting. Then, slice along the marks left by the twine.

flank steak gruyere souffle and chard

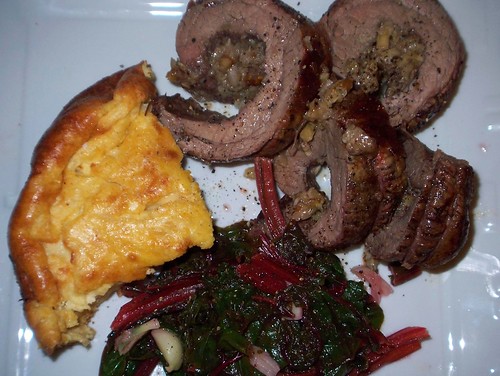
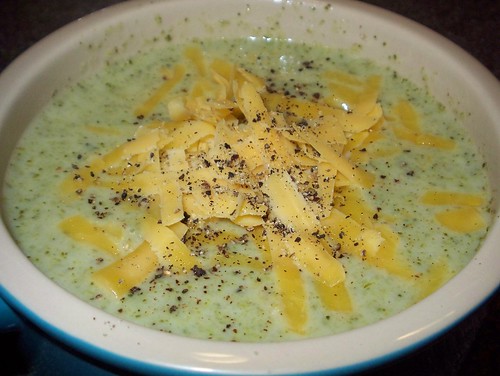
I served this with swiss chard with garlic and an easy gruyere souffle.

Tuesday, January 27, 2009

sneaky sloppy joes

sloppy joes

These sloppy joes will trick you into eating healthy. I saw the idea on food network some time ago, where you replace some of the red meat in your normal sloppy joe base with equally filling, high protein and fiber-packed beans. Technically, ground beef with beans probably makes it chili though...? Either way, these turned out great. Even A, an avid bean-hater, said the beans just sneaked into the sandwich without him even noticing.

Grocery list: one pound ground sirloin, one can kidney or pinto beans (drained and rinsed well), 1 can tomato sauce, tomato paste, red wine vinegar, worcestershire sauce, tabasco, yellow mustard, 1 red bell pepper, 1 onion, 3-4 cloves garlic, 1/2 cup brown sugar, olive oil.

beef and onion for slppy joe base

Chop the onion. Preheat a couple tablespoons of olive oil over medium-high heat, then add the onion and the beef. Stir to break the meat apart.


adding pepper and garlic to beef base

Chop the pepper and mince the garlic while the beef cooks. After about 5 minutes, the onions will start to turn translucent and the beef will be about half cooked. Add the pepper and garlic.

seasoning for sloppy joe filling

While the peppers start to soften, add a generous splash of both worcestershire and red wine vinegar (1-2 tablespoons each). Measure out half a cup of brown sugar and open up the tomato sauce.

beans sugar tomato sauce paste for joes

After the peppers have cooked about 5 minutes, the beef should be cooked all the way. Now you can add the can of tomato sauce (that's about 2 cups), plus 2 T tomato paste. I also added a generous squirt of french's yellow mustard, since that's how my mom always made it, plus a shake of tabasco to taste. Stir in the brown sugar, then season with salt and pepper. Turn the heat down to a low simmer and cook for about 10 minutes.

finished sloppy joes

If you have the time, you can turn off the finished dish and let it sit there for a while (an hour, whatever) and the flavors keep melding together - just reheat when it's time to serve. Split fresh hamburger rolls, toast them under a broiler, and pile the filling in. Serve with lots of Frank's Red Hot or tabasco. (Do you see these buns? I made them! I'm working on fresh bread now - more on that when I'm confident enough to share...)

Monday, January 26, 2009

butternut squash soup

butternut squash 1

I hope it doesn't do injustice to this recipe to start a post with another apology, but I feel it's due. Sorry for 2 soup posts in a row. But this one is so good you won't mind, I promise.

Butternut squash soup is one of those things, like risotto; you order it in a restaurant and love it, but assume it's too complicated to make at home. But, like most vegetable-cream soups, it's simply a matter of vegetables cooked in broth until tender, blended, with some cream stirred in at the end. This recipe, another one adapted from The New England Soup Factory cookbook (working my way through one page at a time), is stunning. It adds apple and parsnip to the butternut base, and it's served with a little bit of gorgonzola cheese to counter the sweetness.

Grocery list: 4 T butter, 2 garlic cloves, 1 large onion, 2 apples, 3 carrots, 2 parsnips, 1-2 stalks celery, 1 2-pound butternut squash, 8 cups chicken stock (preferably homemade, covered before here), 1 T worcestershire sauce, 3 T brown sugar, 1.5 c cream (I used half-and-half and it was perfect and still plenty guilty enough), gorgonzola cheese for garnish.

apple celery onion carrot butternut parsnip

Start by prepping all the vegetables: peel, remove seeds if applicable, dice.

chopped vegetables for soup

Melt the butter in a large soup pot over medium high heat, and add all the vegetables. Saute for 10 minutes, then add the chicken stock. Bring to a boil, then reduce the heat to medium so it's just simmering, and cook until the vegetables are soft (about 35 minutes more).

brown sugar cream and worcestershire for soup

Turn off the heat, and stir in the worcestershire and the brown sugar. Season the soup with salt and pepper.

immersion blender for squash

Like all cream soups, you want to blend it *before* you add the cream, which is last. So, either with an immersion blender, or by moving batches of the soup to a blender (carefully - and only fill up the blender half way with each batch, so you don't splatter boiling hot soup all over yourself - the things I learned before having a stick blender).

adding cream to cooked squash

Finally, return the soup to the pot if you've used a blender, and stir in the cream. You might need to turn the soup back on low heat, depending on how hot you like your soup.

butternut squash 2

To serve, place a spoonful or two of gorgonzola cheese crumbles in the bottom of a bowl, and spoon the soup on top. The book actually calls for an even more impressive garnish (crispy prosciutto and sauteed apple slices), but I skipped it.

Thursday, January 22, 2009

creamy broccoli soup

100_3853

Broccoli soup is the perfect comfort food during a cold spell. It's also as (un)healthy as you want to make it, depending on the toppings you add. The actual soup itself couldn't be easier, as most vegetable-cream soups follow the same premise: cook vegetables in stock, add cream, blend with immersion blender, serve. This recipe that I found on Food Network is perfect. If you want to slim it down, substitute whole milk or half-and-half for the heavy cream, and of course use less than the 1/2 pound of cheddar pictured above.

Grocery list: 4 T butter, 1.5 pounds fresh broccoli, 1 large onion, 1 carrot (note, I skipped the carrot since I used the last ones for my stock), 3 T flour, 4 c chicken stock, 1/2 c cream.

100_3845

Over medium-high heat, melt the butter in a large soup pot. Chop the vegetables, then saute them until the onions are translucent, about 5-6 minutes. Season with salt and pepper.

100_3846

Sprinkle the flour over the vegetable base, stir and cook for a couple minutes, until the flour starts to turn golden brown.

100_3848

Pour in the chicken stock (one quart box of the pre-made kind, or make your own), and bring to a boil. Simmer over medium heat until the broccoli is tender, another 15-20 minutes.

100_3850

Stir the cream into the soup.

100_3851

Puree the soup with an immersion blender, then do a taste check, adding more salt and/or pepper if necessary. Serve with grated cheddar cheese (and/or bacon, croutons, crackers, etc).

Sunday, January 18, 2009

bacon wrapped maple pork loin

bacon wrapped maple pork loin

First, an apology/excuse... I've been (and still am) traveling to Colombo, Sri Lanka, for a work trip. As with all other work trips, I cooked up a storm before leaving (both so A would not starve in my absence, and also so I'd have some photos and recipes to blog about when I'm up at 4am with jet lag and nothing to occupy my time but the indiscernible plotlines of Bollywood movies). But this trip, I've just been so busy, and more homesick than usual, so I've been avoiding the pictures of familiar comforting foods. Without further procrastination, here is an amazing recipe I found on Epicurious for a roasted pork loin. It is certainly not meant to be cooked, portioned and then frozen, but I'm happy to report that this is what I had to do out of necessity, and A has informed me it worked perfectly well. Note that you'll need between 8 and 24 hours to brine the pork before roasting it.

Grocery list: (for the brine) 1/3 cup kosher salt, 2 T maple syrup, black peppercorns, 2 sprigs fresh sage, garlic, 1 bay leaf, 3-4 pound boneless pork loin roast; (for the roast) 3 garlic cloves, 2 T finely chopped fresh sage, 3 T maple syrup, bacon slices, 1 T cider vinegar.

brine for maple pork

To make the brine, combine the salt with 8 cups of water, a smashed garlic clove, a couple sprigs fresh sage, a bay leaf, 1 T of syrup, and a large pinch of black peppercorns. The original says to heat this all in a saucepan over the stove, but to save some of the dishwashing, I placed this in the bowl I normally use to brine things (meaning, a big one), and heated it in the microwave for 3 minutes. Allow to cool to room temperature, then chill in the fridge for an hour.

pork loin in brine

Submerge the pork loin in the bowl, and chill for at least 8 hours and up to 24.

maple sage garlic paste for pork roast

When it's time to roast the pork, remove it from the brine and pat it dry. Make a paste of 3 minced garlic cloves, the sage, and 1 T of the syrup.

pork loin with sage maple paste

Rub this over the top and sides of the pork.

bacon wrapped around pork loin

Lay strips of bacon across the pork to cover the top - the original calls for 16 slices but I only needed to use 6. Tuck the ends of the bacon underneath the pork. Roast at 350 degrees on the center rack of the oven until the pork is 140 degrees (this took a little over an hour).

maple cider vinegar glaze

Make the glaze by mixing the remaining syrup with the cider vinegar, then brush this over the pork. Return to the oven and continue to roast until the internal temperature of the pork is 150 degrees (this was about 15 more minutes for me).

bacon wrapped pork loin 2

When the roast is done, remove from the oven but leave it resting in the pan for about 15 minutes. This will allow the pork to reabsorb some of its juices. The original recipe provides instruction for cooking up a simple au jus from the pan juices mixed with more syrup and cornstarch, but I decided to skip this. If you end up trying it, let me know how it turns out. Slice the roast on the diagonal to serve.

Friday, January 9, 2009

double-beef chili

double beef chili 1

Chili is probably not the first thing that comes to mind when you're trying to plan a healthy dinner. But if you're careful not to pile on too much cheese and sour cream (ahem), it's actually a good balance. There's a ton of protein, in this case from both the ground sirloin and the trimmed brisket; there's fiber and more protein from kidney and black beans; there's tons of vitamins and antioxidants in the tomatoes, peppers and the butternut squash. And if you consider how well it freezes and reheats, it's basically the perfect one-dish meal. I was inspired to try brisket and butternut squash by a recipe I found in Bon Appetit months ago, although beyond these 2 ingredients, I put this together on my own.

Grocery list: 1 pound lean ground sirloin, 2 pounds brisket (trimmed of fat and cut into bite-size cubes), 1 butternut squash, 1-2 onions, garlic, 1 bell pepper, 2 cans of beans (kidney and/or black bean work well), 2-4 cups beef stock, 2 28-ounce cans crushed or diced tomatoes, chili spices (paprika, chili powder, cayenne pepper, cumin).

onions garlic peppers for chili

Start by chopping the vegetables for the base. Set a large dutch oven over medium-high heat, add a couple tablespoons of olive oil, and add the onion and pepper. After 2 minutes, add the garlic.

cooking ground beef for chili

Stir well, then add the ground meat and break up with a spoon.

seasoning brisket for chili

While the ground beef starts to cook, season the brisket with salt and pepper. I trimmed it of any excess fat I could find before cutting it into pieces. Add the brisket pieces to the pan and stir to combine.

seasoning cooked beef for chili

The idea is to get the brisket pieces to brown a bit on the outside; you don't need to cook them all the way through because they will braise in the chili for hours. Once the meat is brown (only a few minutes), add the seasoning. I used about 3 T of chili powder, 1 tsp of cayenne, 1 tsp cumin, and 1 T paprika. I also added a few splashes of Frank's Red Hot. This part is really up to you - just remember you can always add heat later, but you can't take it away.

adding beans and crushed tomatoes to chili

Drain and rinse the beans thoroughly. Add them to the pan, along with both cans of tomatoes (including the tomato juice). Stir to combine, and bring to a boil. Lower the heat to a slow simmer.

cubed butternut squash in chili

Finally, peel and cube the butternut squash into bite-size pieces, and add to the chili. Cook uncovered, adding beef stock every 30 minutes or so as the liquid evaporates.

chili cooked down

I let this chili simmer all afternoon, so I added nearly a quart of beef stock over the course of the day, but you might need less. You can see in the picture above how much it has cooked down - this is just before I served it. Taste it and adjust the salt or spices as needed. To serve, ladle into bowls and top with sour cream, grated cheddar, even some chopped red onion or avocado.

Tuesday, January 6, 2009

morton's crab cakes

morton's crab cake

Last Christmas, A and I went to Pittsburgh to visit his family. This was back before he was in grad school, and we were fortunate enough to have 2 incomes and could afford to take his parents and brother out for a nice dinner at one of our favorite (if somewhat generic) steakhouses, Morton's. The day after was Christmas Eve, the night of his family's big seafood feast. After eating the crab cakes at Morton's, I immediately wanted to try to recreate them for the family meal. I found the recipe online, and the result tasted almost exactly like the original - or maybe better, since I was so proud to have contributed to the tradition. This year, we didn't have Morton's, but we did make a double batch of their crab cakes.

Grocery list: 1 cup fresh white bread crumbs (approximately 6 slices white bread, crusts removed), 2 garlic cloves, 1 shallot, fresh parsley, ground white pepper, prepared horseradish, dijon mustard, mayonnaise, 1 pound jumbo lump crab meat, worcestershire sauce, 2 eggs, tabasco, butter.

parsley garlic shallot breadcrumbs

Start by making the bread crumbs as the base. To a large bowl, add the fresh bread crumbs, then 1 T minced garlic, 1 tsp minced shallots, 1 tsp minced fresh parsley, a pinch of salt and 1/8 tsp ground white pepper.

mustard mayo sauce

Next, make the mustard mayonnaise (a little of which is used in the actual crab cakes; the rest is served on the side when the crab cake is cooked). Mix 1/2 cup mayo with 4 tsp dijon mustard, 1/4 tsp worcestershire, and 1/2 tsp prepared horseradish. Stir well to combine.

jumbo lump crab meat

Rinse the crab meat in a colander, picking through carefully with your hands to make sure there are no little pieces of shell remaining. It's very important to use jumbo lump - it costs a few dollars extra per pound, but the consistency is much better (and there is little to no shell to worry with).

bread crumbs parsley for crab cakes

Assemble the crab cakes by mixing the bread crumb mixture with the crab meat, along with 2 T of the prepared mustard mayonnaise. Also stir in 1 T finely chopped fresh parsley, 1 extra tsp of dijon mustard, 2 beaten eggs, 1/2 tsp worcestershire and 1/4 tsp tabasco.

crab meat mixture

Combine with your hands gently, then shape into 6 mounds. Allow to rest on a cookie sheet in the fridge, uncovered, for 30 minutes. According to a Tyler Florence episode I once saw, this 30 minute rest allows the crab meat to dry out a bit, so it will bake instead of steam itself (which would make for chewier crab).

crab cakes ready to bake

Line a rimmed baking sheet with foil, then brush with melted butter. Add the crab cakes to the sheet, then bake for 5 minutes at 450 degrees. Flip the crab cakes, then cook for another 4 minutes. Serve with extra mustard mayonnaise on the side.